The onset of winter gives most of us plenty of time to work in our shops, which sometimes are nicer than the house. Now is the time to go over our equipment from head to toe to make sure it is ready to go when temperatures reboot to something warmer.
Most people have a servicing plan that they initiate themselves; others rely on their equipment dealers. Some manufacturers even offer incentives to bring machines to your local dealer for service. These incentives include parts’ discounts on work completed at the dealer and for parts that are ordered to stock your farm shop.
One of the most extensive winter checks that we perform is on forage harvesters and heads. This inspection can take a few days, depending on the chopper. Our technician goes over each machine with guidance from a 20-page checklist, looking for loose and worn parts along the way.
The list is too involved for most owners, but we encourage those who want to help with the inspection to do so. This way the operator can become more familiar with their cutter. This isn’t a process that will work for everyone and every machine, but we have several customers who prefer to be there and help while the inspection is being completed.
Dealers offer different options when it comes to completing winter forage harvester service. Most dealerships, including mine, find that our mechanics are far more productive in our own shops rather than on the farm with the customer. So, some dealers have offered to split or completely pay for the hauling cost of the machine to and from the dealership. The cost of shipping the unit can usually be a wash if you must pay for a couple service calls to your farm to complete the work.
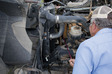
Check the cab
One of the easiest places to start a forage harvester inspection is in the cab. Operator comfort on those 12-plus- hour days is important. Be sure to check your windshield wipers, fluid, and the often-neglected cab air filter. Clean the air intake as well. While inspecting the top of the cab, it’s a good idea to double-check all of the air conditioner components, including the evaporator and fans.
Once in the cab, remove all the panels on the console to inspect the wiring and for cleaning. Make sure you have some spare fuses stored away in the panel for emergencies. Double-check all of the lights to make sure they are functioning properly, too. We will come back to the calibration part once we have finished inspecting the rest of the machine.
Next, let’s get to the meat of the cutter — the intake system. Each manufacturer has its own way of feeding, cutting, and processing, but the end result is basically the same. Starting at the feed rolls, check the bearings and the fluid levels on the gearboxes. This is also a good time to check the universal joints, which supply power to the rolls. The smooth roll scraper on the back can often be overlooked during the season, so winter is a good time to flip or change the bar. Also, it’s the perfect time to check the electrical components of the feed roll housing, namely the metal detector and rock protection to make sure they do not have any damage and are functioning properly.
Stay sharp
Once the intake is complete we usually move on to the drum, inspecting its bearing and knives. We typically don’t have to change the knives until operators finish with their winter annuals; however, every part of the country and machine is different, so be sure to check knife wear and make sure the nut bars are in good shape.
Most of our customers choose to start out the year with a new grinding stone and there is no easier time to take it apart than when the intake housing is off the harvester. We also usually manually grease all the grease banks and fittings as well as inspect the auto lube system to make sure every fitting is taking grease.
Whether the kernel processor (KP) is in or out of the machine, it needs to be checked. Make sure that wear liners are not worn through. Also, look over the KP rolls, springs, and bearings, checking for any play, chips, or wear. Now is the best time to order these parts, not two weeks before you need to be cutting corn.
Inspecting the blower is when I usually find out how well the machine was cleaned up during the fall based on how much buildup is on the paddles and in the accelerator housing. Be sure to check these bearings close as they drive other aspects of the machine. Also, when inspecting the pulleys that drive each belt, make sure there is nothing packed in the grooves of the pulley. This can be a source of vibration that is easily fixed by just cleaning them out.
More power
Moving on to the transition and spout, the worm gear and spout pivot point are important places to inspect closely for wear. Check the liners in the spout and the hydraulic cylinder on the flipper for wear and functionality. Also, many of the newer harvesters are using cameras and winter is a good time to clean them up and make sure there is no damage to the cables running up the spout.
The drive components and main gearbox are important parts of the harvester. Along with the cooling section, they help determine how many tons of forage are processed each day. Be sure to check the main drive belt for any worn spots or separation, both of which can be the source of vibration. Most main-drive gearboxes have some sort of filtration system that needs to be changed annually.
Winter is also a good time to inspect the precleaning screen and brushes on the air intake if installed. This screen is one part that has caused at least a few hours of downtime for everyone who has cut silage. Be sure to do a diligent check-over of the engine well. The engine mounting bolts are often overlooked but take as much abuse as any bolts on the unit.
The complete hydraulic system can be complicated and may require extra assistance from your dealer to check for the correct hydraulic pressures on the test ports. Jacking up the cutter to test and calibrate all drive functions is also a good practice. Finally, running the complete system to calibrate the lifting cylinders, drum angle, central lubrication, and spout are important. Be sure to retorque all wheels and drive components, and make sure all fluids are at correct operational levels.
Proper winter maintenance on a forage harvester is lot of work, but time spent in the shop will mean more uptime cutting in the field this summer.
This article appeared in the February 2018 issue of Hay & Forage Grower on pages 20 and 21.
Not a subscriber? Click to get the print magazine